THE SLIP AND SLIDE METHOD – with an introduction on Embossing techniques
Reference:
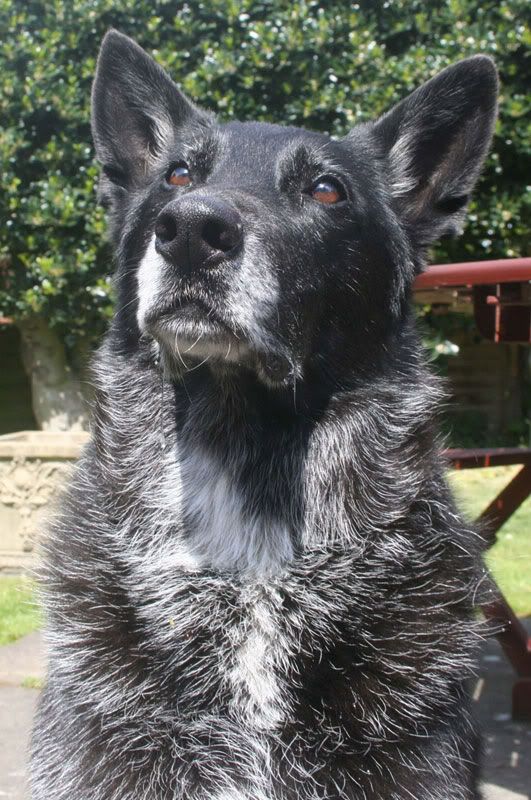
The source reference is from a photo I took of a dog called “Jed”, who I was commissioned to sketch and decided to create the artwork on June 4th, International Drawing Day.
Weapons of choice:
Pentel Mechanical Pencils (P203, P205, P207 and P209 – Leads (2B, 3H and F)
Pair of scissors (borrowed from our sewing box)
Electric eraser
Kneadable eraser
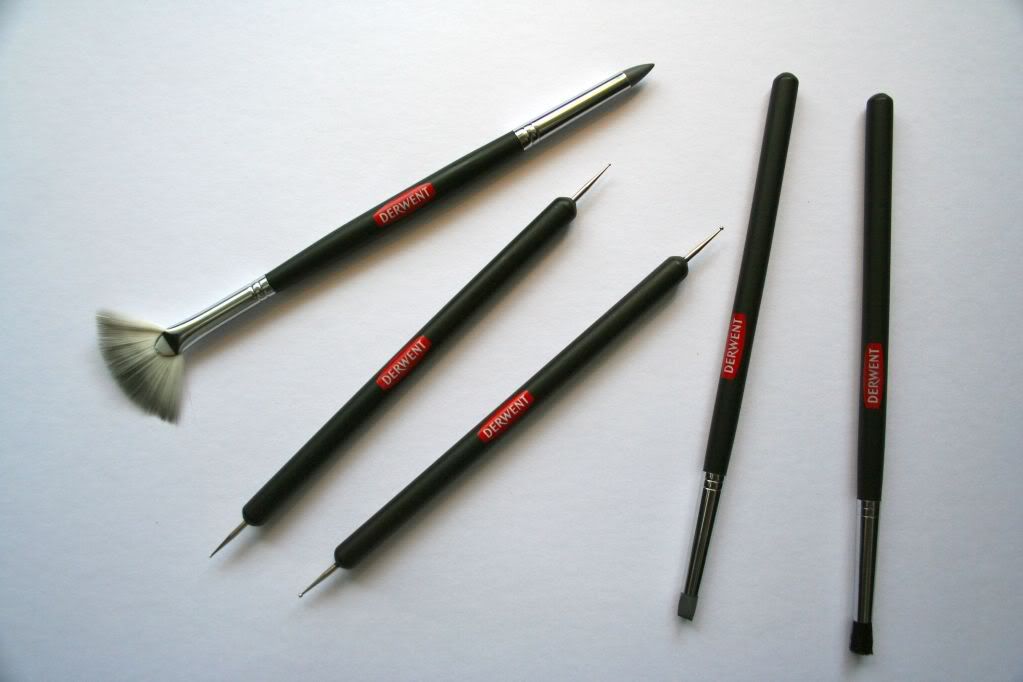
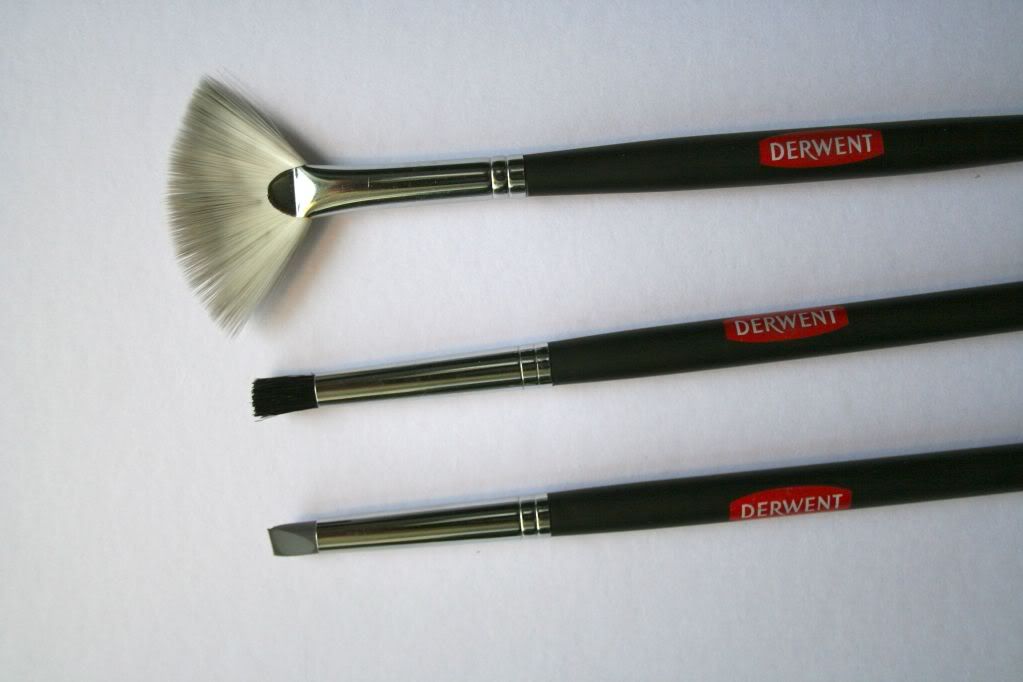
Derwent Essential Embossing tool set
Copious amounts of tea (Earl Grey?)
Digestive biscuits or Jacobs Cream Crackers (optional)
Paper:
Paper: Goldline Bristol Board 220 gsm
Size: A3 420mm x 297mm (16.5 inch x 11.7 inch)
Introduction:
This “The Slip and Slide Method* as I like to call it, is something I created for some of my drawing classes I used to teach locally, some of my students were always having problems trying to get the basic outline of whatever they wanted to sketch down on paper, invariably they were out of proportion, ran off the paper (we’ve all done that at least once right!) or the images were so small as to make working on them nigh impossible. So out of necessity I came up with this The Slip and Slide Method(it probably exists in some other form with some really classy name, but I don’t honestly know of it – that’s for the copyright lawyer folks out there!) probably started in my days as a Police Artist at New Scotland yard, back in the day (before computers and tinternet) when we used to use Photo-Fits to create faces, these were basically pieces of facial features in strip format, an police artist/operator would put together to compile a face of a wanted felon.
I guess I wanted something that any student could get an outline off their reference and onto paper, quickly and with the least bit of hassle involved. Something that would keep their work fairly tidy and comprehensible. Both left handed and right handed folks be able to use (yup, I’ve seen a left hander use this to their satisfaction).
If you know anything about me and my art (sketching and painting) I live by a simple law, “I draw (or paint) what I see”. So I decided that if I wanted to sketch an A3 sketch (20mm x 297mm or 16.5 inch x 11.7 inch) then I’d use a an A3 size reference (straightforward yes?), OK I realise that this is a big size and I’m lucky enough to have an A3 scanner printer at home, but if you are not as lucky to have one yourself, don’t panic, get to your your local photo-copy (xerox?) store to blow up your reference photo to the same size you are comfortable with sketching and in black and white. If we are going to sketch in black and white we really need to see the reference photo also in black and white (OK painters, you can use a colour reference, but may I just ask, why are you in my class? This is for pencil pushers only!)
We could go straight into Step 1 below, but I like to put my reference through the computer first and play around with filters and such in Adobe Photoshop (if your not into computers or Adobe, don’t worry, this bit is only for the computer nerdy artists out there… I scan in the original photo and after cropping it to a suitable size and proportion, I mask out the background clutter and erase it with only the dog itself on a white background (this helps you concentrate on your reference only – I suppose you could cut out the subject in your reference photo and get it photocopied on a white back drop).
I decided I wanted to give the bottom of the sketch something snazzy and cool looking, so I made a mask of zig zags that dwindles down to the bottom right hand side of the picture. I would love to be able to get quality source of beautiful zebras, cheetahs, leopards and tigers, but as they are few and far away from here in the UK, I thought I might use some kind of stripey effect to try and give my sketch something to make it stand out in the jungle of all those other beautifully sketched and painted dogs online. I’ve used this zig zag effect before and it seems to work Ok, especially with a dark dog.
After I’ve got the effect I want, I play around with the on board filters, high structure values, brightness and contrast values until I’m happy that the reference looks exactly how I want it to look like for my sketch, I print out an A3 size copy on photo paper (this or inkjet give you the best contrast in the printout).
Step 1

Here I have the reference printout I’m going to use for this sketch. It is the same size as the paper I’m sketching on. Which is going to make comparison whilst sketching easy to see.
Step 2
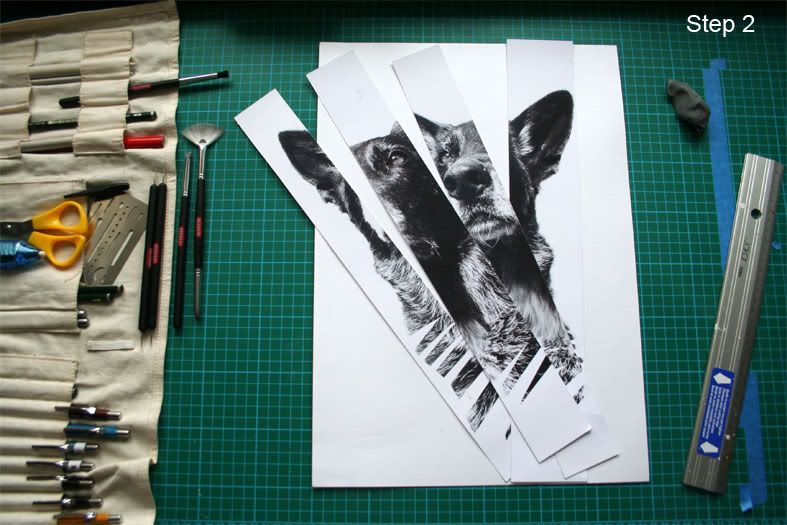
The first thing I do is to use the scissors (please little ones, have a grown up present or ask them to do this bit for you), and cut the reference printout into five fairly even strips or slips, vertically. See this is why I called the first part of my method slip, (and you folks in the back of the class, can stop giggling now!)
Step 3
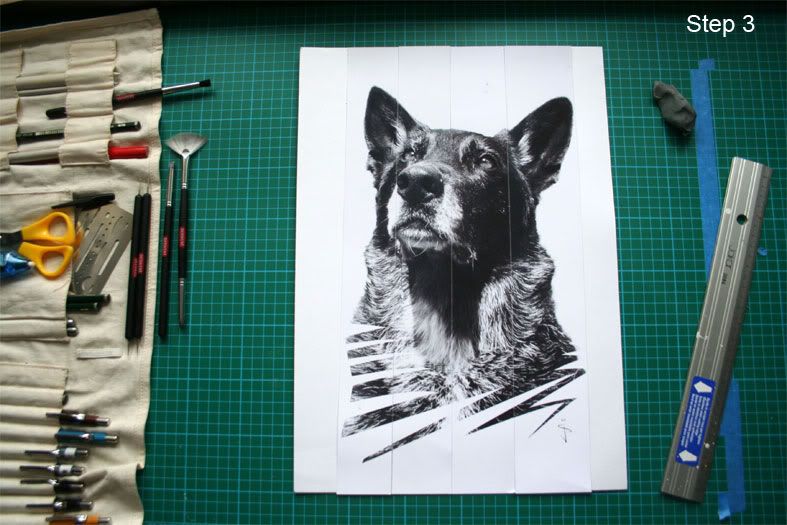
I then position the strips onto the paper, roughly where I want the sketch to be placed, this makes sure your sketch is atheistically placed, where I think it looks best.
Step 4

Being right handed, I’m using the first strip on the left side (all you left handers can use the the last strip on the right hand side) I then keep this strip in place with one hand and use a pencil to mark the top width on the paper, just wee little marks only please, but enough so you can find them easily.
Step 5
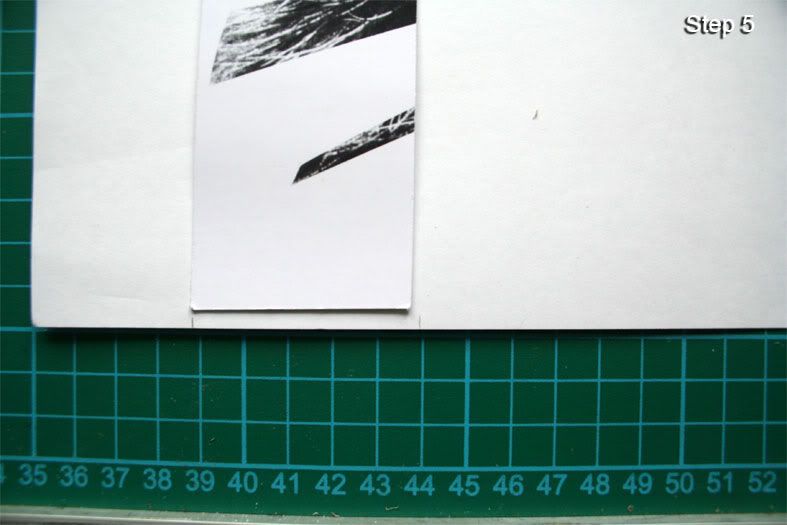
I then mark the bottom width of the strip on the paper, again with two wee pencil marks, similar to what I did in the step above.
Step 6
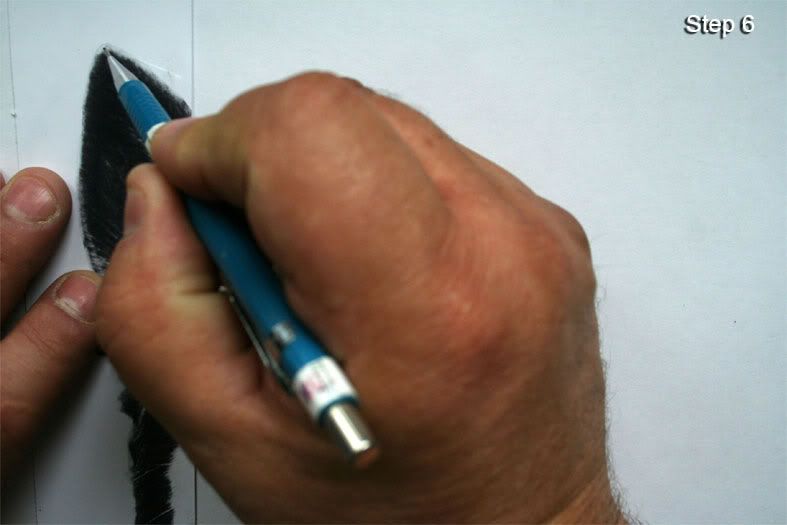
Now the slip sliding part comes into action here, I’ll go slowly so those at the back can understand (George! please pay attention! and Barbara! take that chewing gum out of you mouth now girl!). I’m using my left hand to hold the first strip in place (checking that it is within my four marks on the sketch paper (left handed folks just do the reverse of what I’m showing you). Holding my pencil in my right hand leaning on the sketch paper and not on the reference strip just a few millimetres above the point of the ear I air draw the top peak of the ear, air drawing is like air guitar – not on the reference strip or on the sketch paper but just above where it is shown on the reference strip.
Step 7
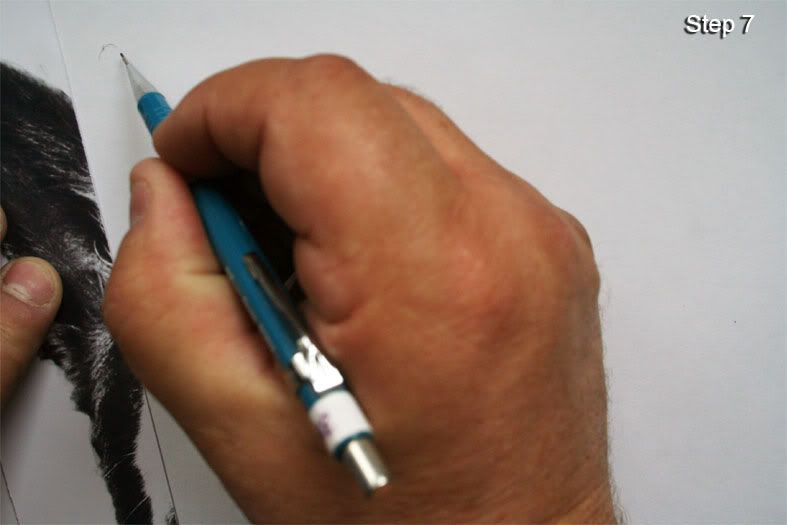
I know it sounds stupid, but bear with me OK? When you are confident you know where the tip of the ear is going to be, keep your pencil hand steady on the sketch paper and with your left hand slip the reference away only enough to show the sketch paper underneath and now with your pencil hand (still steady on the sketch paper and the pencil hovering a few millimetres above the paper) pencil in lightly an ear tip on the sketch paper. Imagine the strip of paper is like a playing card, well just like a playing card, you can move it to an fro back onto the sketch paper (between the marks you pencilled in, remember those?) with a bit of practice, it is just like moving playing cards on a poker table (OK Marlene, Tarots cards are fine too!). Thus was born the name of my Slip and Slide method! So until I hear of a better title, this will have to do.
Step 8
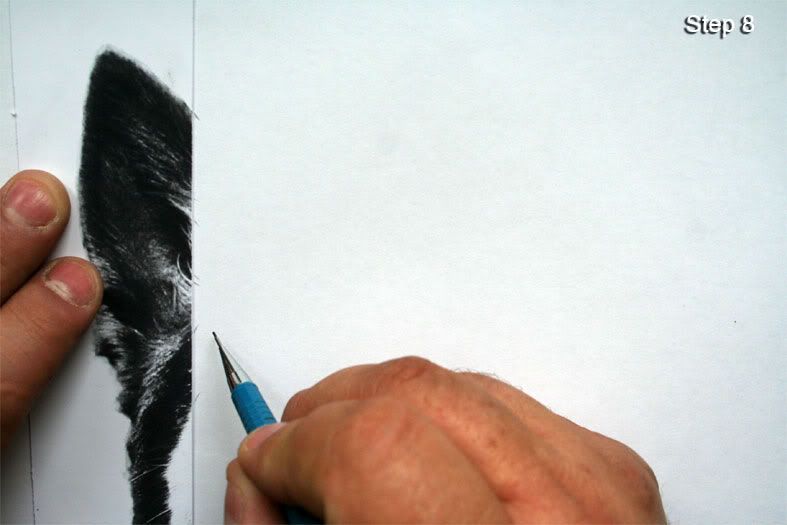
With your reference strip back in place (between the pencil marks on the top and bottom) if you look at the right edge of the reference strip, you can see divisions on the reference where light begins and dark area end and so forth, well now we can mark some wee lines onto the sketch paper where these light and dark areas begin and stop, try and make the marks go in the same direction the divisions are going in (i.e. see those bits of white fur in the ears, and how they are kind of diagonally on the reference strip? well follow through on the sketch paper with your marks.
Step 9
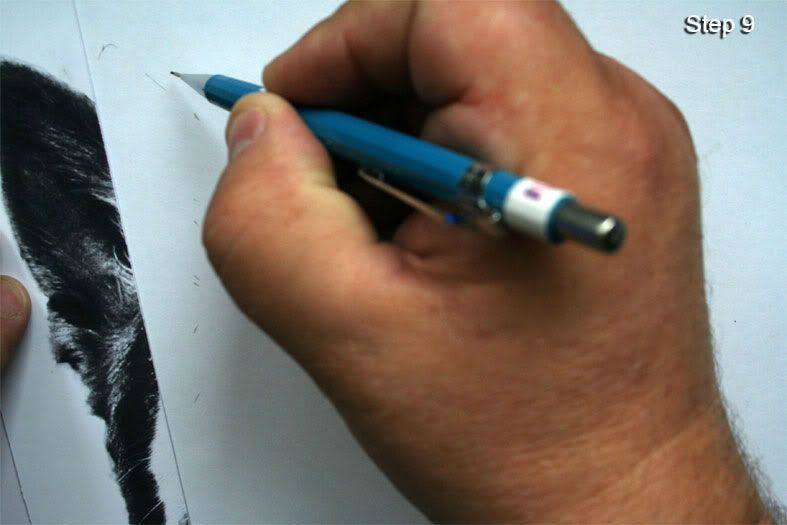
Now using this remarkable low carbon footprint method of Slip and Sliding, use it to begin marking a few marks of the outline of the ear, it’s a bit like joining the dots, if you have enough of them, you can very quickly join them up to one another and the edge marks you’ve already placed down.
Step 10
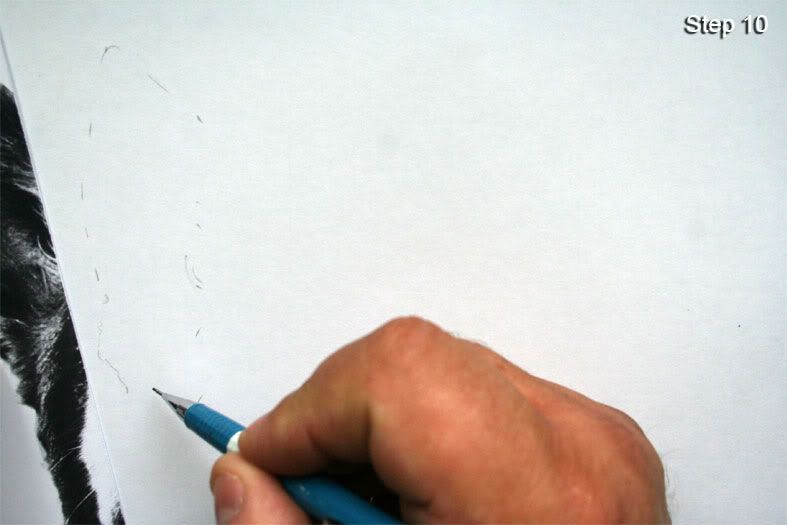
Continue using the slip and slide method to track the outline of reference onto the sketch paper, when you get a bit faster (as all my students did) you can readily check some marks you’ve already placed down if it gets a bits wonky here or there.
Step 11
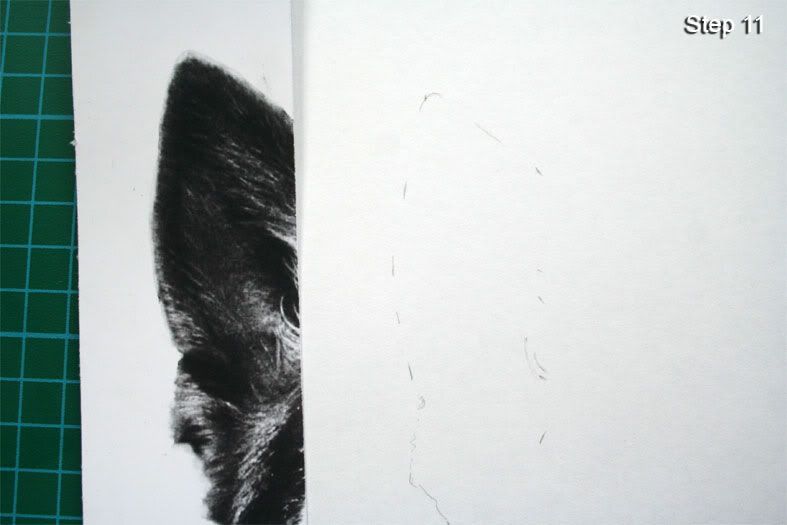
We now should have enough marks on the sketch paper for a fairly accurate outline the ear.
Step 12

I carry on down the reference strip to begin marking out the shoulders of the dog and the edges of this zig zag finish I want to sketch. You can see how I only marked the corners of each zig zag and then I simply sketched in between my marks in a zig zag fashion. My students found this is a real quick and dirty way to get the reference outline onto the paper, accurately and fairly quickly. Catherine! stop looking out of the window, and please try and pay attention!
Step 13
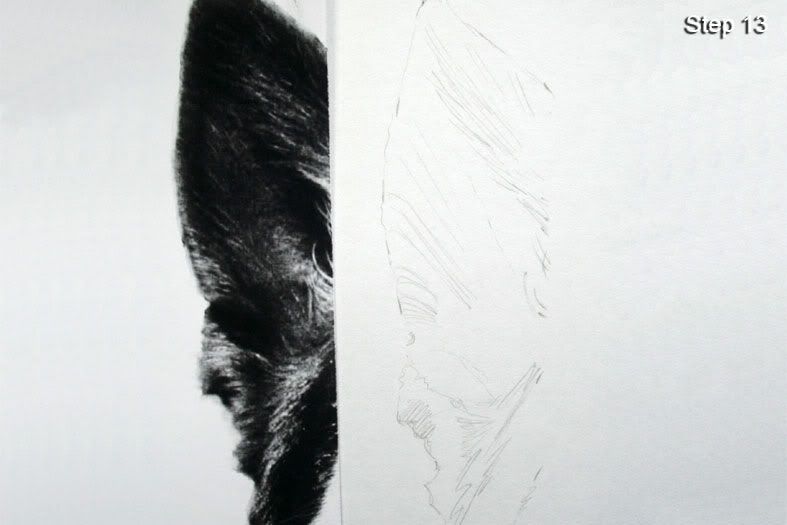
Going back to the ear, I sketch in freehand the structure of some of the inner fur and lighter sections, as it is only a small section of the whole sketch, you may find this easy to do as well, if not, then use the slide and slip method to help you get the structure lines you need.
INTRODUCING EMBOSSING TOOLS
Step 14
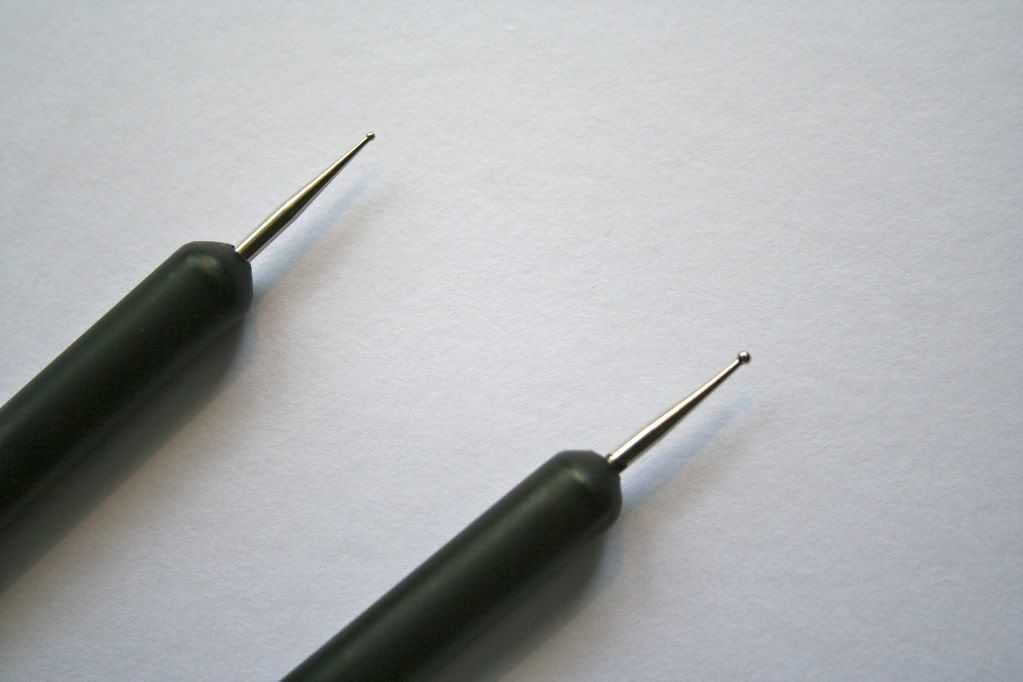
Okay now for the fun part you’ve all been waiting for, using your embossing tools (Barry!, please be careful! they are not swords!) in this part of the sketch, I’ve marked a few light hairlines and whiskers, that I want to make stand out, in the days of old, we pencil pushers had to either sketch around each whisker and hairline we wanted to stand out, making sure we didn’t sketch over it or perhaps we sketched in the fur and used a very thin edge rubber or electric eraser to make those whiskers right? Well, I’ve since found that these embossing tools are the bees knees for getting fine lines, whiskers and hairlines onto your sketch. The Derwent set comes with two embossers with a ball point tip on each end, one with a tiny and small tips and the other with a medium and larger tip (I’ll call them 1, 2, 3 and 4 – 1 and 2 being the tiny and small embosser and 3 and 4 the other medium and large).
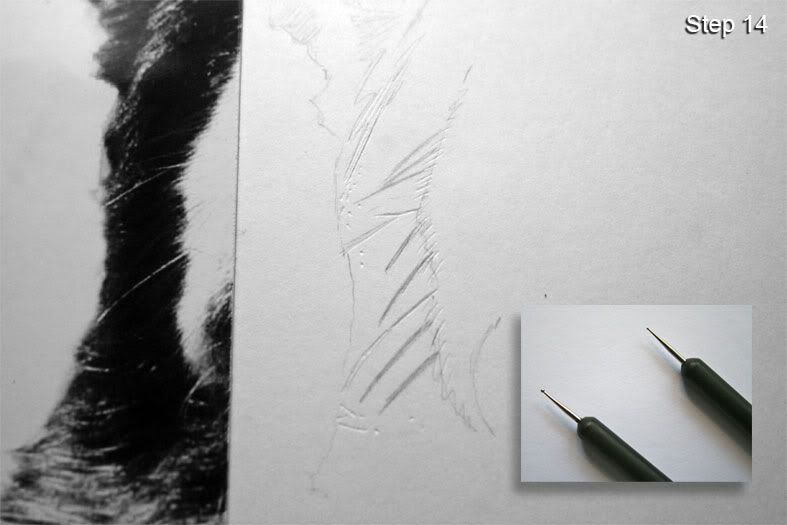
Using the No.1 embosser, I press into the sketch paper (over the outline I’ve marked and joined up) I’m using the embosser like I would use a pencil (so you pencil pushers should be OK here), if I was using a pencil, I would press harder for a thicker line and lighter for a thin line, well I’m using the embosser the same way, for a thick whisker, I press hard going lighter for the thinner tip of the whisker.
Step 15
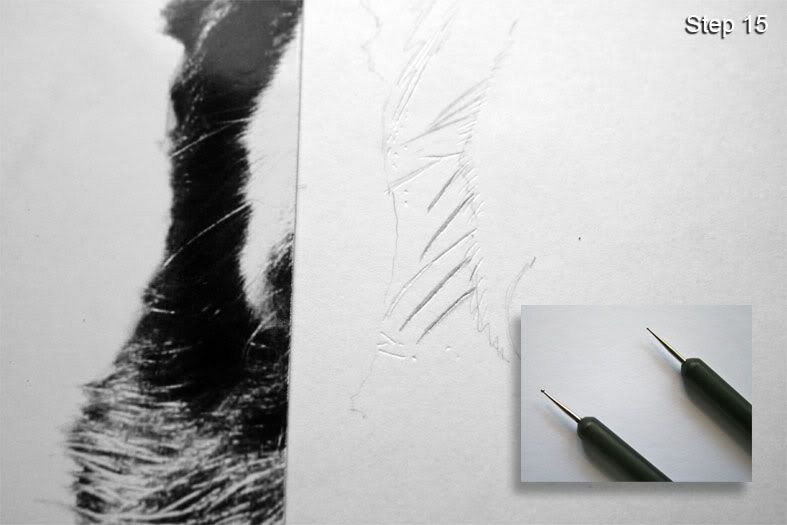
I use No’s 1, 2 and three for various thicknesses I want to achieve. On the heavy paper I’m using (220 gsm) it allows you to carve in beautiful grooves. I also use the tips of the embossers to place small hole indentations here and there, and those few odd speckles of white and light tone you find on your reference, (this, I find, is what makes my sketches seem photo-realistic) but please be careful not to puncture the sketch paper, which is why I like to sketch on a hard cutting mat or board.
Tip:
For a white whisker on your sketch, use the embosser on the sketch paper, for a shaded toned whisker, use the embosser on the pencilled line so that the pencil is inside the embossed groove.
Step 16
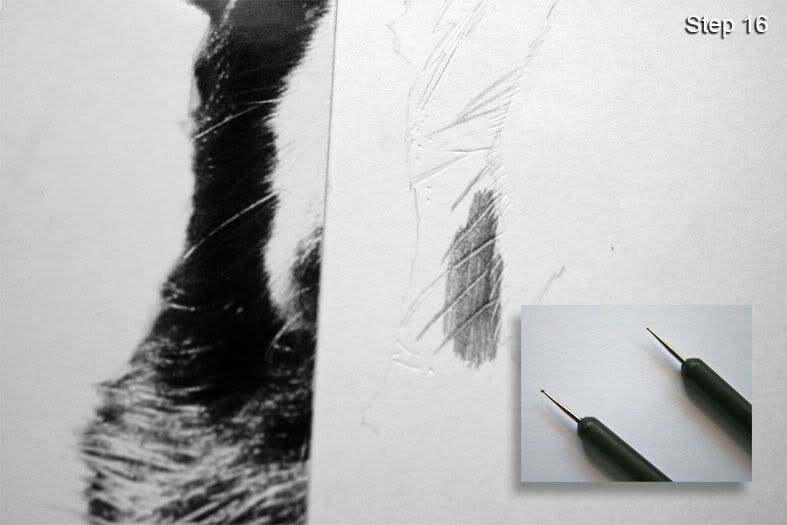
Once I have carved in enough whiskers and hairs I want standing out, I begin to hatch over the embossed area with a 2B pencil, keeping the pencil strokes fairly tight and always going over the grooves and not into them. You will notice as you hatch over in pencil the lines you embossed earlier, magically start appearing.
Step 17
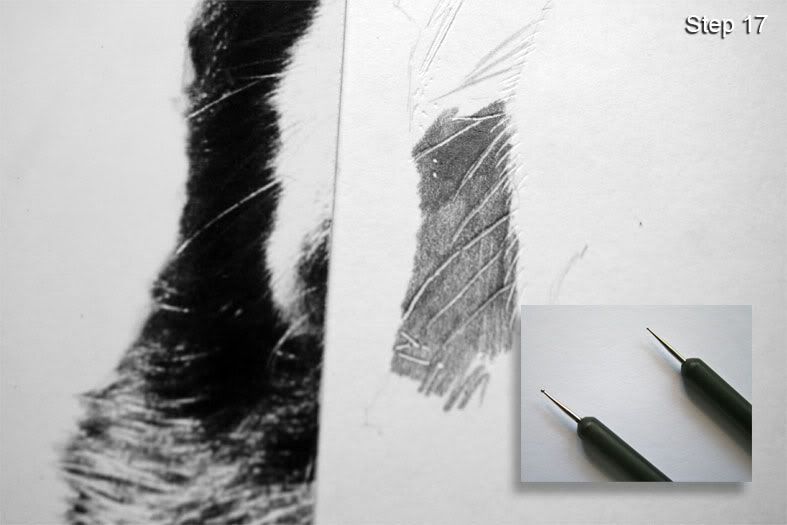
The more you begin shading, you soon realise that you can easily carry on shading as normal, because every time you go over you embossed grooves, they stand out more and more, in the old days, you had to take great care to define the edges of whiskers as they sometimes collected more pencil along their edges when you try to keep them tidy, embossing (I find) lets you get on with getting your tonal shading spot on without worry about having to negotiate around those pesky whiskers all over a dogs face! You can easily pencil and hatch light or dark between whiskers you predefined with ease.
Step 18
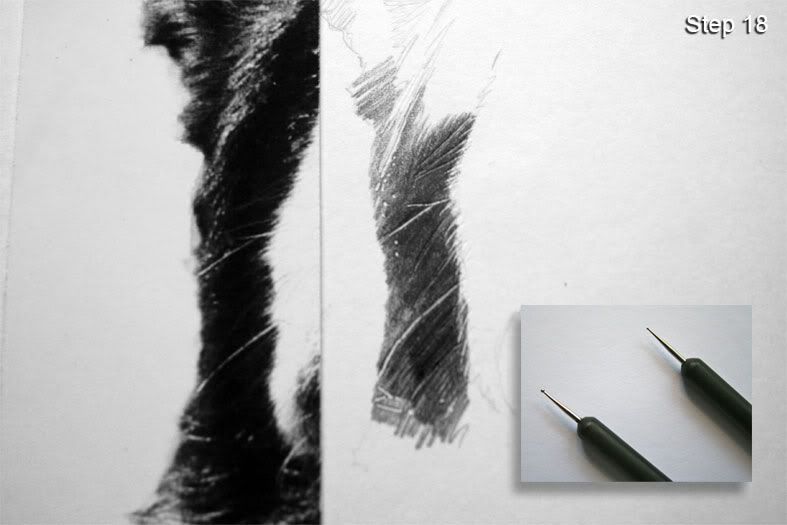
Here you can see how I’ve feathered the dark fur into the white fur and begun to show a few hi-lights here and there.
Step 19
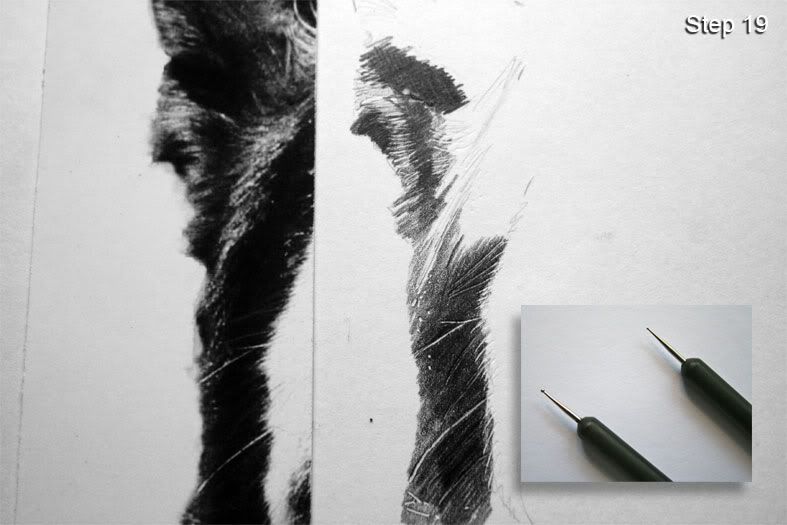
I’ve moved up to the base of the ear, and used Embossers No. 2 and 3 to cut in a few curved hi-lights and then gone over in a 2B pencil to blend those hi-lights into the darker fur.
Oh there goes the bell! well that’s all for now boys and girls, thank you for your time and please remember, to bring your work books into class tomorrow, and we will continue sketching Jed the dog.
Thank you for your time and especially your patience in reading this tutorial, I do hope you now have some kind of insight into my slip and slide method and introducing the Embossing tool. I will carry on with the full sketch later on.
Jan (happy sketching).
